I am going to show you how to create knockout photos for your etsy shop, using photoshop. Click on any image to view it FULL SIZE.
What is a 'knockout'?
Knockouts are photographs that feature the item and follow all of the following rules:
* absolute pure white background (#FFFFFF)
* no cropping of the item or item's shadow
* no graphic design
Basically, these little guys at the top of etsys front page; So, how do you create a 'knockout'? Firstly, follow my blog on how to take great photos and then follow the instructions here :)
Don't have Photoshop? Try this website
Step one,
Open your photo in photoshop. Then go to Image > Adjustments > Auto Levels/Auto Contrast/Auto Color.
Each of these will alter your image slightly. Sometimes it makes it look worse, and sometimes it looks a whole lot better. If it looks better, leave it, if not undo!
Step two,
Go to Image > Adjustments > Curves. A little box pops up. Click on the one that says 'Set white point' and then click on a white part of your image. I have marked where I clicked with a red circle. When you are happy with the result, click 'OK'.
Now select the 'Magic wand' and select all of the white bits.
Step three,
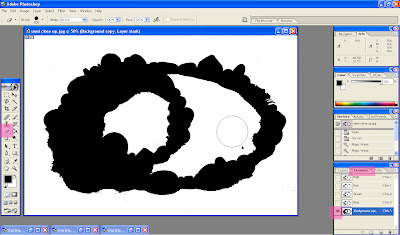
Now, all of your white bits should be selected. In the layers menu, click and drag your layer to the 'Create a new layer' box (number 1) and this will duplicate your current layer. Now, making sure your top layer is selected, click 'Add layer mask' (number 2). You should now have a black and white version of your image (layer mask). Click on the black and white image.
Step four,
Click the 'Channels' tab and then select the bottom option. Your image should now appear black and white. Select the 'Eraser tool' from the left menu and erase any black bits that shouldn't be there. For example, if you look closely, you will see a fly on my first picture, so I have erased him in step 4. Also make sure that all of the corners are white. When you are done, click on the 'Layers' tab again, and then on the top colored image.
Step five,
Select the 'color picker' on the left menu, and select white. RGB should be at 255. This is pure white, or '#FFFFFF'. Once you have set this, click on the brush tool, make the brush big and make sure it is 100% flow and 100% opacity. Brush all over your image. Make sure you don't miss any bits.
Step six,
Select the black and white image again (the layer mask)
Go to Filter > Blur > Gaussian Blur and a little box will pop up. Set the radius to a number between 1 and 10. This will blend your shadows into the white. Don't make it too high or your image will go cloudy.
Step seven,
Canvass size. Your image needs to be square. Go to Image > Canvas size... adjust the smaller number to match the bigger. For example, if your image is 60 x 40, change it to 60 x 60. Make sure 'Relative' is NOT checked.
Now your image is HUGE but square
Step eight,
Image size. Go to Image > Image size... Make sure 'Constrain Proportions' IS checked. Change the top number to 1000 or less pixels. The other numbers should all change too.
Step nine,
List it!
Wednesday, 2 July 2008
How to create knockout photos for etsy using photoshop
Monday, 16 June 2008
How to take great photos
 Something that makes a great etsy shop is great item photos. So many people struggle with taking photos (I was one of them!) but now I have gotten pretty good, so I figured I would write a 'how-to' on taking photos. I have used a necklace which was made for me by my lovely friend little Vicky.
What you will need;
Some items!
At least 2 sheets of white card (or 1 really big sheet)
Daylight
A camera.
My camera is digital, and has a Macro setting (it looks like a little flower). For this tutorial, I am not using any photo-editing software, no photoshop, no gimp, just a camera and some card. Please click on any image to view it full size
So, Step 1, Camera and scene set up
Go outside, make sure you are not facing the sun (it should be to the side or behind you), lay 1 piece of card on the ground, and stand the other piece behind it. Get your camera, and point it toward the card, so the card fills the screen. Select your menu option, find the 'EV compensation' or 'white balance' and adjust it until the white card looks white on your camera. Don't over do it :) Then select the 'Macro' option, this will usually display a blue flower on your screen.

 Make sure you have selected the macro option. Now place your item on the card, and line it up so it's in the middle of your screen. Press your shutter half way down so your camera can focus, then all the way down to take the picture. How does it look? If it is coming out blurry, you might be too close or too far away.
Step 2
Now you have your scene and camera set up, you can start taking close ups and quirky angle shots. There are a few things to think about when doing this;
Try not to get huge shadows in your photos.
As you can see, shadows can totally spoil your photos! It takes the eye away from your item, which is not what you want. To avoid it, move to the side of your item, or take your photos when the weather is slightly over-cast.
Here are some of the photos I took today; And this close up, with and without macro setting;
 If you can take photos like this, it is sure to help you with your etsy shop.
If you have any photography tips, please feel free to share them by leaving a comment!
Now you can photoshop your photos to get them looking even better!


